
Large Format Print File Setup: Expert Artwork and File Preparation for Optimal Signage Results
Preparing artwork and files for large format printing is crucial for achieving high-quality signage results. This process involves understanding the specific requirements and best practices that ensure your designs translate effectively from digital formats to physical prints. In this article, we will explore essential artwork preparation techniques, technical specifications, and tips for optimizing your signage output. Many businesses face challenges in producing print-ready files that meet industry standards, leading to costly errors and delays. By following expert guidelines, you can streamline your file preparation process and enhance the quality of your printed materials. We will cover best practices for artwork preparation, essential technical specifications, and key print-ready file guidelines to help you avoid common pitfalls.
Artwork Preparation Best Practices:

Effective artwork preparation is the foundation of successful large format printing. To ensure your designs are print-ready, consider the following best practices:
- Resolution Requirements: Always use high-resolution images (at least 300 DPI) to prevent pixelation in the final print.
- Color Mode Specifications: Utilize CMYK color mode for accurate color reproduction, as RGB colors may not translate well to print.
- File Format Recommendations: Save your files in formats like PDF, TIFF, or EPS, which preserve quality and support vector graphics.
Following these best practices will significantly improve the quality of your printed signage. High Stakes Creative specializes in providing professional branding and signage services, ensuring that your artwork meets all necessary specifications for large format print applications.
Essential Technical Specifications:
Understanding the technical specifications for large format print files is vital for achieving optimal results. Key specifications include:
- Size and Dimensions: Ensure your artwork is set to the correct dimensions for the intended print size, including any necessary bleed areas.
- File Size Management: Keep file sizes manageable to facilitate easier handling and processing during printing.
- Layer Management: Organize layers effectively in your design software to simplify edits and adjustments.
By adhering to these technical specifications, you can enhance the efficiency of your print production process. High Stakes Creative offers expert file preparation services tailored to meet these technical requirements.
Tips for Achieving Optimal Signage Results:
To achieve the best possible results in large format printing, consider the following tips:
- Material Selection: Choose the right materials for your signage, as different substrates can affect color and durability.
- Visibility Considerations: Design with visibility in mind, ensuring that text and images are legible from a distance.
- Installation Tips: Plan for the installation process, considering factors like location and environmental conditions that may impact the signage.
Implementing these tips will help ensure that your signage not only looks great but also performs well in its intended environment.
Large Format Print File Preparation for High-Quality Signage
Vector artwork is essential for large format printing due to its scalability without loss of quality. Key specifications include:
Understanding the fundamental differences between pixel-based and vector-based graphics is crucial for ensuring optimal quality and scalability in large format printing.
Pixels vs. Vectors for Large Format Printing
The pixel, as an image’s fundamental unit, underpins raster graphics by defining detail through color and light. Vectors, by contrast, construct mathematical, precise, and infinitely scalable images, widely used in contemporary illustration. In today’s digital arts, pixel and vector coexist and blend into innovative creations, allowing tradition and innovation to intertwine within a rich and complex visual language.
Traditional Art in the Digital Age: Formats, Pixels and Vectors, 2025
- File Formats: Use vector formats such as AI, SVG, or PDF to maintain quality during scaling.
- Color Profiles: Ensure that your vector files are set to CMYK color profiles for accurate color representation.
- Font Embedding: Always embed fonts in your vector files to avoid font substitution issues during printing.
Which File Formats and Color Profiles Ensure Print Accuracy?
For optimal print accuracy, the following file formats and color profiles are recommended:
- File Formats: PDF, AI, and EPS are preferred for vector graphics, as they maintain quality and scalability.
- Color Profiles: Use CMYK for print projects to ensure colors appear as intended on the final product.
How to Embed Fonts and Maintain Vector Integrity?
Embedding fonts is crucial for maintaining the integrity of your vector artwork. Follow these steps:
- Select the Font: Choose the font you wish to embed in your design software.
- Embed the Font: Use the “Embed Fonts” option in your software settings before saving the file.
- Convert Text to Outlines: As an alternative, convert text to outlines to eliminate font issues entirely.
How Do Bleed Margin Requirements Impact Print Quality and Design?
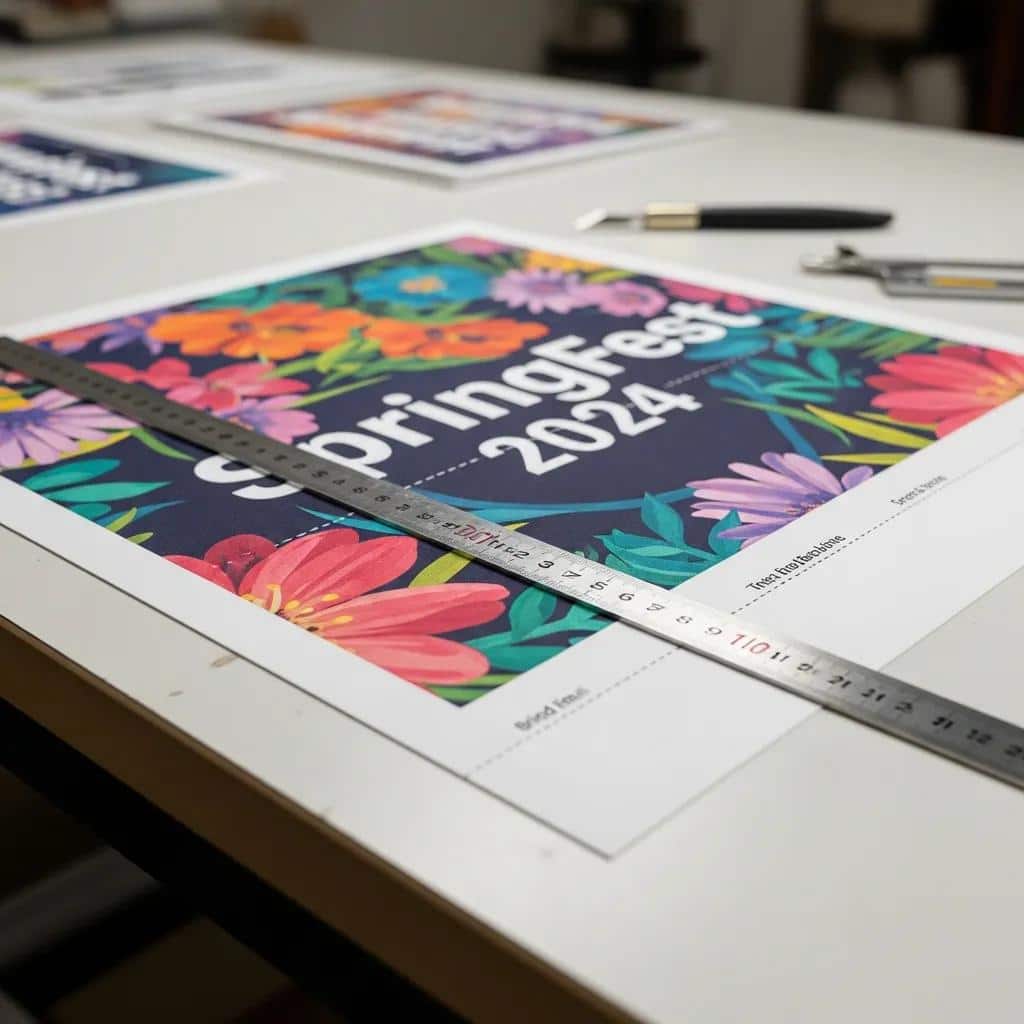
Bleed margins are critical in large format printing, as they ensure that designs extend beyond the trim area, preventing unwanted white edges. Understanding bleed requirements can significantly impact the final print quality.
- Definition of Bleed Margins: Bleed margins are the areas outside the trim line that allow for slight misalignments during cutting.
- Impact on Design: Designs should extend into the bleed area to ensure a seamless appearance after trimming.
- Best Practices: Always include a minimum of 0.125 inches of bleed on all sides of your artwork.
What Are Standard Bleed and Trim Guidelines for Signage Files?
Standard guidelines for bleed and trim areas include:
- Bleed: A minimum of 0.125 inches is recommended for most signage.
- Trim Line: This is the final cut line where the print will be trimmed.
- Safe Zone: Keep important text and graphics at least 0.25 inches inside the trim line to avoid being cut off.
How to Use Visual Diagrams to Understand Bleed and Trim Areas?
Visual diagrams can greatly aid in understanding bleed and trim areas. Consider the following:
- Diagrams: Use diagrams to illustrate the relationship between the bleed area, trim line, and safe zone.
- Examples: Provide examples of correctly set up files to guide designers in their preparations.
What Are the Key Print Ready File Guidelines to Avoid Production Errors?
To avoid production errors, adhere to the following print-ready file guidelines:
Meticulous pre-press file management is paramount for graphic designers to prevent common technical problems and ensure a smooth printing process.
Pre-Press File Management for Graphic Design
Technical problems can arise when a graphic designer submits digital files to a commercial offset lithographic printer. The graphic design profession has an opportunity to strengthen the education of design students by teaching them how to recognize potential printing prroblems and address them before the students enter professional practice. The purpose of this thesis is to identify the most common design problems and printing constraints that designers encounter when they develop an item to be printed using offset lithographic printing. The graphic design content of this thesis will include design development processes that specifically focus on issues of imposition, pagination, color management, and image reproduction.
Redefining the responsibility of pre-press file management within graphic design: How printing technology impacts our design development, 2006
- Resolution Checks: Ensure all images are at least 300 DPI for high-quality prints.
- File Format Verification: Confirm that files are saved in the correct formats (PDF, TIFF, EPS).
- Color Mode Confirmation: Double-check that all files are set to CMYK color mode.
How to Check Resolution, Scaling, and File Formats Before Submission?
Before submitting your files, follow these steps:
- Resolution Check: Use software tools to verify that all images meet the 300 DPI requirement.
- Scaling Verification: Ensure that the artwork is scaled correctly to the intended print size.
- File Format Confirmation: Check that all files are saved in the appropriate formats for printing.
What Proofing Steps Ensure Consistent and Cohesive Branding?
Proofing is essential for maintaining consistent branding across all signage. Key steps include:
- Color Proofing: Review color proofs to ensure accurate color representation.
- Content Review: Check all text for accuracy and consistency with brand guidelines.
- Final Approval: Obtain final approval from stakeholders before printing.
How Can Localized Case Studies Demonstrate Effective Signage File Preparation?
Localized case studies can provide valuable insights into effective signage file preparation. Consider the following examples:
What Successful Atlanta Projects Showcase Best Practices?
Several successful projects in Atlanta highlight best practices in signage file preparation, including:
- Project A: Demonstrated effective use of color and material selection for outdoor signage.
- Project B: Showcased the importance of resolution and bleed margins in high-visibility locations.
How Do These Examples Highlight Benefits of Professional File Setup?
These case studies illustrate the benefits of professional file setup, such as:
- Quality Output: Ensures that signage meets high standards for visibility and durability.
- Durability and Clarity: Professional setups lead to clearer, more durable signage that withstands environmental factors.